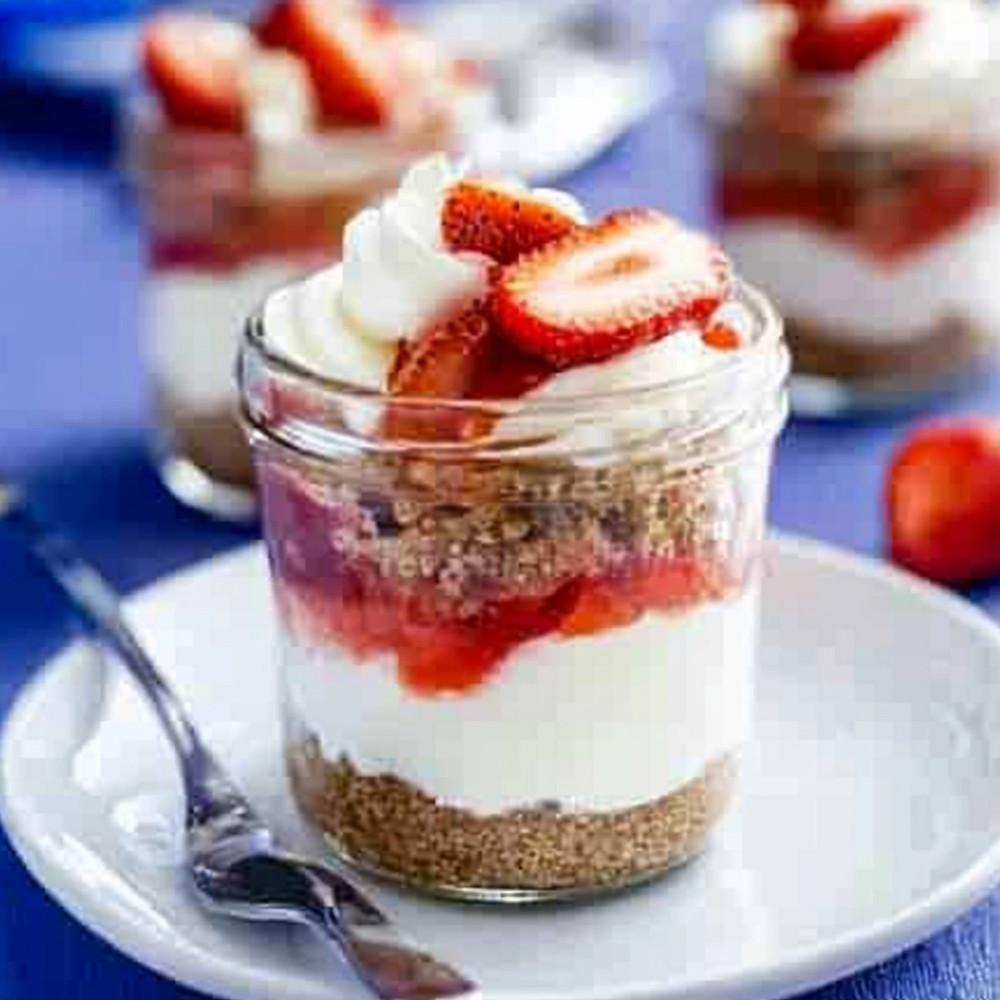
Decadent Strawberry Cheesecake Sundae Pots to Indulge In
So, picture this: it’s a sunny afternoon, and you’re sitting outside, enjoying the gentle breeze, and suddenly you find yourself craving something sweet, something chilled… something like strawberry cheesecake sundae pots. They’re like little jars of happiness, combining smooth cheesecake with the vibrant sweetness of strawberries. Honestly, just thinking about them makes my mouth water! It’s that perfect mix of creamy, fruity, and just a hint of crunch from the biscuits… just heavenly!
Why You’ll Crave It
- The creamy cheesecake pairs beautifully with the juicy strawberries — it’s like a flavor explosion!
- They’re super simple to whip up… no baking involved, which is a total win for us home cooks!
- Visually stunning, so they’re perfect for impressing guests at dinner parties or just for yourself!
- Customizable too! You can toss in different fruits or even swap the crust… so many possibilities!
My family fights over the last one… like, seriously, it gets intense!
What You’ll Need
- Cream Cheese: 250g, softened, so it’s easy to blend and really creamy
- Sour Cream: 1 cup, adds a nice tang that cuts through the sweetness
- Sugar: 1/2 cup, because who doesn’t love a bit of sweetness?
- Vanilla Extract: 1 teaspoon, for that warm, comforting flavor
- Heavy Cream: 1 cup, whipped, to create that light, airy texture
- Digestive Biscuits: 200g, crushed, for that perfect crunchy base
- Strawberries: 400g, diced, fresh and delicious
- Mint Leaves: for garnish (totally optional, but it looks so fancy!)
- Extra Sugar: for macerating strawberries, if you want them just a bit sweeter
Easy How-To
Prepare the Cheesecake Mixture
Okay, so grab a bowl — a nice big one — and mix together that softened cream cheese, sugar, and vanilla extract. You want this to be super smooth and creamy, so if you’ve got an electric mixer, use it! If not, use a good old whisk… you might get a workout but it’ll be worth it!
Add the Cream
Now, in another bowl, whip the heavy cream until you get those soft peaks! It’s like magic… and that airy texture is essential! Gently fold that whipped cream into the cheesecake mixture — and do it carefully, you want to keep it fluffy!
Prepare the Strawberry Sauce
Next up, let’s make that strawberry sauce. In a saucepan, toss in your sliced strawberries, sugar, and a splash of lemon juice. Cook it over medium heat until it’s all bubbly and the strawberries are soft. Once they’re done, let the sauce cool down a bit. That’s the good stuff right there!
Layer the Sundae Pots
Now, you get to layer! In your serving cups or jars, start with a layer of that luscious cheesecake mixture at the bottom… then spoon in some of that strawberry sauce on top. Repeat until the cups are full — and finish off with a generous dollop of strawberry sauce on the very top. So pretty!
Chill the Sundaes
This step is so crucial, you guys… pop those sundae pots in the fridge for at least 2 hours. This is where the magic happens—letting all those flavors meld together. I promise it’s worth the wait!
Serve
Before serving, sprinkle some fresh strawberries or even a little whipped cream on top. You want it to look as delicious as it tastes, right? Enjoy your gorgeous creation!
Good to Know
- These sundae pots stay fresh in the fridge for up to 3 days, just keep them covered!
- Feel free to mix it up! Try other fruits or cookie crumbs for a twist.
- Make sure that cream cheese is softened to avoid lumps… trust me, it makes a difference!
Serving Ideas
- Serve these sundae pots with a side of extra strawberry sauce for drizzling… because why not?
Top Tricks
- If you’re short on time, you can prep the cheesecake mixture and sauce ahead of time — just assemble before serving!
Frequently Asked Questions
Can I make this dessert in advance?
Absolutely, yes! You can prepare everything ahead of time and just layer it just before serving… it keeps wonderfully!
What can I substitute for cream cheese?
If you’re looking for a twist, mascarpone cheese works beautifully, giving a different but lovely flavor!
How long can I store the sundae pots?
They can chill in your fridge for about 3 days, but make sure to add fresh toppings just before enjoying them for the best taste!
Can I use frozen strawberries?
Sure! Just make sure they’re thawed and drained, you don’t want too much water in your sauce!
Is it possible to make a low-sugar version?
Definitely! You can cut back on the sugar or swap it for your favorite alternative — still delicious!
Conclusion
So there you have it! These delightful strawberry cheesecake sundae pots are not just a feast for the eyes, but they also deliver a wonderful balance of creamy and fruity flavors. Perfect for gatherings or just a sweet treat at home… they’re bound to become a cherished favorite in your dessert repertoire!
More recipes suggestions and combinations
Berry Delight Sundae
Mix raspberries, blueberries, and strawberries with vanilla ice cream for a refreshing twist.
Chocolate Cheesecake Sundae
Layer chocolate cheesecake with chocolate syrup, whipped cream, and crushed cookies for a decadent treat.
Tropical Paradise Sundae
Go tropical with coconut cream, pineapple chunks, and mango puree for an island vibe.
Peanut Butter Cup Sundae
Combine peanut butter with cheesecake layers for a nutty explosion topped with crushed cups and chocolate drizzle.
Mint Chocolate Chip Sundae
Combine mint chocolate chip ice cream with minty cheesecake layers for a super refreshing option.