Guyanese Pholourie Recipe
The very first time I smelled pholourie frying, I was standing in my auntie Reshma’s kitchen – oil crackling in the pan, turmeric rising in the air like this gentle earth-warm cloud, spiced and savory and unmistakably home. There was something about the golden little rounds – tucked onto a paper towel-covered plate, too hot to eat but too tempting to resist – that made the whole room feel like a gathering, even though it was just the two of us. That salty crunch, then the pillowy-soft inside… still makes my heart squeeze a bit, to be honest.
Why You’ll Crave It
- The crispy-on-the-outside, plush-on-the-inside texture is everything a snack should be
- Deep, earthy flavors from turmeric, cumin, and coriander – cozy and aromatic
- Pairs beautifully with tangy chutneys or fiery pepper sauce – you can change the mood with the dip
- Great for sharing at gatherings… or sneaking straight from the plate while nobody’s looking
- It’s comforting, almost meditative to make – a bowl, a spoon, a quiet rhythm
The first time I made this alone, I stood by the stove whispering little hopeful prayers that they’d puff up right – and they did, golden and bright and kind of perfect.
What You’ll Need
- All-purpose flour: 2 cups – soft and neutral, the base for the batter
- Salt: 1 teaspoon – just enough to bring all the flavors together
- Turmeric powder: 1 teaspoon – warm and golden, almost a little citrusy
- Baking powder: 1 teaspoon – for those gentle little pockets of air inside
- Ground cumin: 1 teaspoon – earthy, unmistakable, almost smoky
- Ground coriander: 1 teaspoon – slightly sweet, an absolute must
- Green chilies: 1-2, finely chopped – optional, but lovely if you like a little heat
- Water: about ½ cup, maybe a touch more depending on your flour
- Vegetable oil: enough to deep-fry – neutral oils like canola or sunflower are great
Easy How-To
Mix the dry base
In a wide, deep bowl (something that feels like it has room to breathe), whisk together your flour, baking powder, turmeric, salt, cumin, and coriander. Just until it all looks evenly tinted. The fragrance is gorgeous at this stage – you’ll know you’re on the right track.
Fold in flavor and water
Add in the chopped chilies now, if you’re including them. Then pour in the water bit by bit, stirring gently in circles. You’re looking for a thick batter here – not stiff, not runny. It should drop slowly off the spoon with a bit of resistance.
Let it rest a moment
This step isn’t mandatory, but if you can spare 10-15 minutes, let the batter sit while you heat up your oil. It helps with hydration – the flours relax, and the flavors get more cozy with each other.
Heat the oil
Fill your pot with about 2 inches of oil and bring it to a steady medium-high heat. Not smoking, just hot enough that a dropped bit of batter bubbles right away and floats up almost smiling.
Drop and fry
Scoop spoonfuls of batter and carefully slide them into the hot oil. They’ll puff up as they cook – it’s lovely to watch. Turn them gently so they brown evenly. If you’re multitasking, try not to walk too far away though – they cook fast, 3 to 4 minutes is plenty.
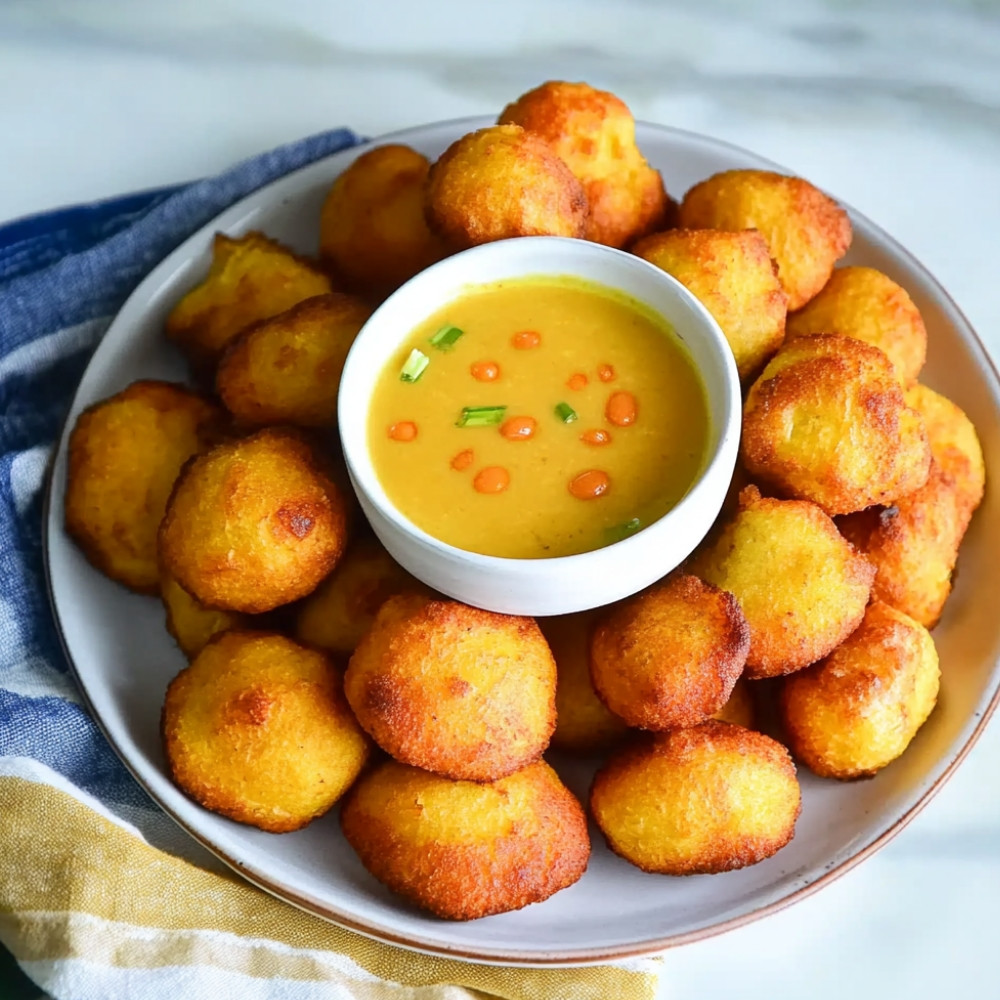
Drain, cool, and serve
Lift each one out with a slotted spoon and let them rest on a paper towel-lined plate for a minute or so. Serve warm, especially with something tangy nearby. Mango chutney is my personal favorite – though a bright, herby green sauce works beautifully too.
Good to Know
- If the batter’s too runny, your pholourie might flatten instead of puffing – add a tablespoon of flour to thicken it up if needed
- You can freeze leftover batter for up to a month – just thaw it in the fridge and re-stir before frying again
- If one side of the pholourie browns faster than the rest, your heat might be a little high – ease it down, no rush
Serving Ideas
- With tamarind sauce and cold cucumber slices – sharp and cooling with just the right sweetness
- In a small bowl of spiced yogurt with mint – the zing of creamy meets the warmth of fried
- With piping hot dhal (lentil soup) on the side for a cozy meal snack
Top Tricks
- Use two spoons to shape the batter before frying – one to scoop, the other to gently push
- Always do a test fry first – one small dollop will tell you if the oil’s too hot or cold
- Let your batter sit for a while if it feels too tight – resting helps loosen things up naturally
Frequently Asked Questions
Can I make pholourie without split peas?
Yes, this version doesn’t use split peas – more like a simplified street-style pholourie. But traditionally, they do add soaked and ground split peas for texture and flavor. You can blend soaked yellow split peas into the batter for more authenticity if you like.
Why isn’t my pholourie puffing up?
It could be a few things – sometimes the batter’s too thin, or the oil isn’t hot enough. Try thickening the batter just slightly and check if your oil is closer to 350°F. Also, don’t crowd the pan during frying; they need space.
How long do they stay good after frying?
Best eaten within a few hours – though if you have leftovers, pop them in the oven for about 5 minutes at 375°F to bring the crispness back. They won’t be exactly the same but still pretty satisfying.
Can I bake pholourie instead of deep-frying?
To be honest – yes, you could bake them in a hot oven (maybe 400°F), but they won’t crisp and puff quite the same. It’s worth trying if you’re avoiding oils, just keep texture expectations a bit softer.
Is pholourie gluten-free?
Traditional recipes use all-purpose flour, so not gluten-free as is. But I’ve had some success subbing with a gluten-free blend – just make sure it has a binder like xanthan gum or add a bit of psyllium husk to keep it together.