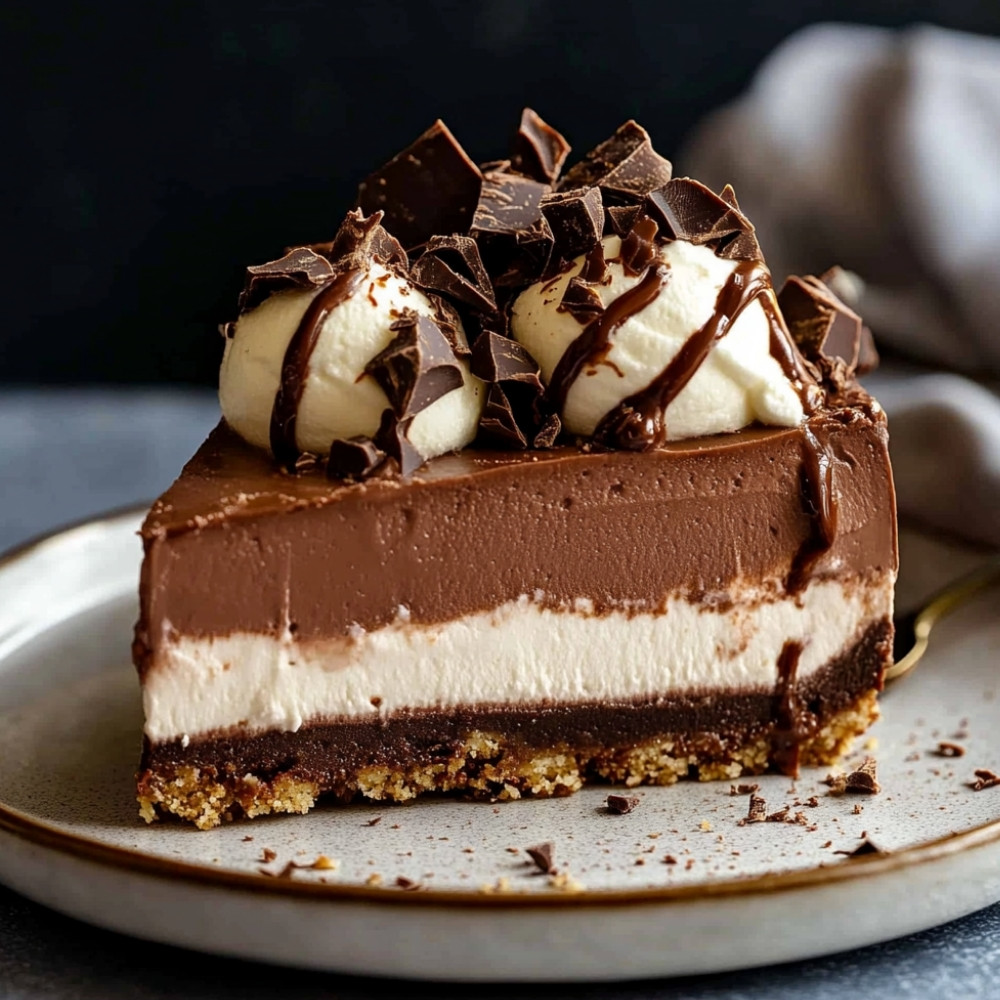
Indulge in No-Bake Nutella Cheesecake Bliss
Oh wow, have you ever tried a no-bake Nutella cheesecake? You know, the kind that just melts in your mouth and makes you smile with each bite? It’s super rich and creamy, not to mention effortless to whip up, which—let’s be honest—makes it even better! Picture that chocolatey goodness meeting the silky texture of cream cheese… honestly, it’s like a hug in dessert form. This recipe has been a hit at family gatherings and friends’ get-togethers, and believe me, once you taste it, you’ll be dreaming about it for days.
Why You’ll Crave It
- It’s completely no-bake, so you can stay cool while making a stunning dessert.
- Perfect for chocolate lovers—seriously, Nutella is like heaven, right?
- Minimal ingredients mean you probably have most of them already, yay!
- It’s a total crowd-pleaser; watch everyone gather around for just one more slice…
- The leftovers (if there are any) just get better in the fridge!
The first time I made this, my kids practically fought over the last piece!
What You’ll Need
- Cream cheese: 8 oz, softened—this is the smooth base we love
- Nutella: 1 cup, because we can’t ever have too much chocolate
- Sugar: 1/2 cup, just to balance out the flavors
- Heavy cream: 1 cup, whipped—this adds that airy texture
- Graham cracker crumbs: 1 1/2 cups, for that classic cheesecake crust
- Butter: 1/2 cup, melted, to hold the crust together
- Salt: a pinch, to enhance all those delicious flavors
- Chocolate shavings: for garnish (optional), because we eat with our eyes first!
Easy How-To
Step 1: Prepare the Base
Okay, so first up, grab your food processor and toss in those crushed graham crackers with the melted butter, right? Just pulse until it looks like, um, wet sand, almost… Now, press that mixture into the bottom of a 9-inch springform pan nice and firmly, and then off to the fridge it goes while we work on our filling.
Step 2: Make the Cream Cheese Mixture
Alright, next, let’s beat that softened cream cheese until it’s super smooth and creamy. You know, no lumps allowed here! Then slowly add in the sugar, and keep mixing until it’s light and fluffy. Trust me, this makes all the difference.
Step 3: Incorporate Nutella
Time to introduce Nutella into the mix! Add it to your creamy blend and mix until everything is looking irresistible and smooth, like a dream. This is where the magic starts happening!
Step 4: Whip the Cream
Now, whip up that heavy cream in another bowl until you get stiff peaks. This might take a minute, so be patient here… it’s going to give your cheesecake that delightful fluffiness. Oh, the anticipation!
Step 5: Fold in the Whipped Cream
Gently fold the whipped cream into your Nutella mixture, using a spatula. And remember, be a bit tender-handed so that foam stays nice and fluffy. You know what I mean? Keep folding until—voilà—the white streaks disappear.
Step 6: Assemble the Cheesecake
Pour that heavenly cheesecake filling on top of the chilled crust and smooth it out. Just a little swipe here and there to make it look pretty.
Step 7: Chill the Cheesecake
Cover it up with some plastic wrap, and then—this is the hard part—pop it in the fridge for at least 4 hours or overnight if you can wait! Letting it set is key, so just try to be patient, okay?
Step 8: Serve
Alright, when it’s finally set, carefully take it out of the springform pan and slice it up. You can garnish with more Nutella or whipped cream if you’re feeling fancy. Enjoy it chilled; your taste buds will thank you!
Good to Know
- If you want to customize the whole crust thing, feel free… use whatever plain biscuits you have on hand!
- Room temp cream cheese = a smooth filling; trust me, it really helps!
- Those leftover slices? They can stay in the fridge for up to 5 days—though, who are we kidding, right?
Serving Ideas
- This cheesecake is fabulous with a fresh fruit topping—like strawberries or raspberries—for a bit of tartness.
Top Tricks
- Warm up your knife under hot water before slicing; it makes cutting the cheesecake so much cleaner!
Frequently Asked Questions
Can I use a different type of chocolate spread?
You absolutely can! Feel free to swap Nutella with another chocolate spread, but just know it might change the flavor a bit…
How long does the cheesecake last in the refrigerator?
It can last up to a week in the fridge, but seriously, it’ll probably be gone long before then!
Can I freeze the cheesecake?
Yes, you can freeze it! Just make sure it’s well-covered. Try to eat it within a month for the best taste.
What can I use instead of gelatin for a firmer texture?
Agar-agar works great if you want a vegetarian option! It gives that lovely firm texture without any gelatin.
Is it necessary to use a springform pan?
Not at all! While a springform pan is super handy, a regular pie dish or cake pan will work—you just need to be extra careful when serving!
Conclusion
This no-bake Nutella cheesecake is a total gem. Creamy, delightful, and simply irresistible, it’s perfect for any occasion. Whether you’re having friends over or just treating yourself—okay, let’s be real, it’s probably both—this dessert is bound to make you smile every single time you take a bite. Chill it, serve it up, and soak in all that chocolatey goodness!
More Recipes Suggestions and Combinations
Chocolate Hazelnut Tart
Transform this into a tart for a more sophisticated twist, layering flavors you just can’t resist.
Nutella Swirl Brownies
Just add a swirl or two of Nutella into your brownie batter for a fudgy treat—so good!
Nutella Banana Smoothie
Blend ripe bananas with Nutella for a thick, creamy smoothie that’s great anytime!
Nutella Stuffed Pancakes
Take breakfast to the next level by stuffing pancakes with Nutella—oh my goodness!
Nutella Cheesecake Bars
Make this cheesecake into bars for easy sharing at parties… you’ll be the star!
Nutella Dip with Fruit
Just mix Nutella with cream cheese or yogurt for a dip that goes perfectly with strawberries or apples. Perfect for snacking!