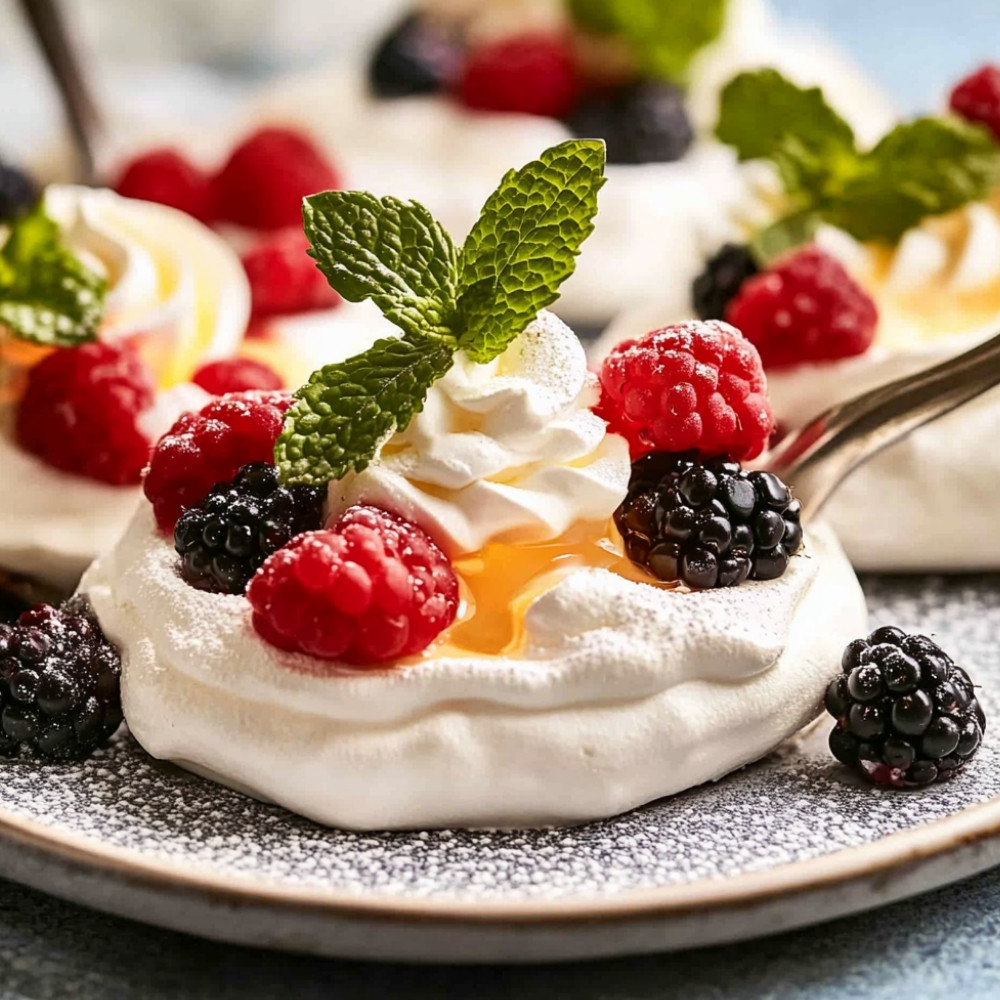
Irresistible Mini Pavlovas Perfect for Any Celebration
Oh, let me tell you about these mini Pavlovas! Picture this: delicate, crisp meringue shells with a super soft center, just waiting for a dollop of whipped cream and a shower of fresh fruit. They look stunning, kind of like little edible clouds on your dessert table, and when you take a bite… it’s like a sweet little hug! Really, they just melt in your mouth, and they’re surprisingly easy to whip up. Perfect for birthdays, celebrations, or, you know, just because you feel like something sweet. Seriously, they’re so versatile, you can make them fit any occasion!
Why You’ll Crave It
- Light as air—once you try them, you might keep dreaming about them!
- Customizable! Fresh fruits, sauces, whatever you love—get creative!
- No need for fancy skills; if you can whisk, you’re golden!
- Great for gatherings—everyone loves them, & they’re so easy to share!
- They just look so pretty and fancy—perfect for impressing guests!
The first time I made these, my friends were begging for the recipe before they’d even finished their plates…
What You’ll Need
- Egg Whites: 4 large, kind of at room temperature, helps them whip up nice and fluffy
- Sugar: 1 cup (200g), superfine or caster for the best texture
- Cornstarch: 1 teaspoon, to give that extra lift
- White Vinegar: 1 teaspoon, helps stabilize the meringue, trust me on this!
- Vanilla Extract: 1 teaspoon, because vanilla makes everything better
- Whipping Cream: 1 cup, whipped to soft peaks for topping
- Fresh Fruits: like strawberries, kiwi, or anything seasonal, just lovely on top
Easy How-To
Prepare Your Oven and Baking Sheet
So, first things first—preheat your oven to a low 100°C (210°F). This low temp is crucial for those lovely crisp meringues. Line a baking sheet with parchment paper and, if you’re feeling fancy, draw some circles about 8cm in diameter as a guide. It’s like your roadmap for mini Pavlova perfection!
Whip Up Those Egg Whites
Grab your stand mixer (or a hand mixer if that’s what you have), and beat the 4 egg whites on medium speed until soft peaks form. This usually takes about 2-3 minutes. You’ll want them shiny and starting to look like clouds!
Add Sugar Gradually
Now, this part is super important: gradually add in that sugar while whipping at high speed, and just keep mixing it until you get thick, glossy peaks—takes about 5-7 minutes. You want the sugar dissolved, so feel free to check by rubbing a little between your fingers; it should be smooth.
Fold in Cornstarch and Vinegar
Once you’ve got those beautiful peaks, gently fold in the cornstarch and vinegar. It’s like a little dance—you want to incorporate it without deflating your fluffy mixture. Take your time here—it’s worth it!
Shape the Pavlovas
Now, grab a spoon—or a piping bag if you’re feeling adventurous—and dollop the meringue on your baking sheet, using those circles as a guide. Make sure to create a little dip in the middle so they’ll hold all that whipped cream and fruit!
Bake and Cool
Time to bake! Pop that sheet in your preheated oven and let them bake for about an hour. After that, turn off the oven and let them cool completely inside—it’s kind of like letting them take a nice, warm nap. The door should be slightly ajar; this helps prevent cracking.
Prepare Toppings and Assemble
While they’re cooling, prep your fruits and whip your cream! Just whip that cream until you get soft peaks, it’s kind of a treat just to give it a good fluff. Once the pavlovas are completely cool, gently remove them from the paper, and then pile on the whipped cream and your pretty fruits. They’re just so inviting!
Good to Know
- If your pavlovas are softening, they may be a little too humid—try making them on a drier day.
- They’re best the same day, but if you have leftovers, just store them in an airtight container.
Serving Ideas
- Serve them on a gorgeous platter, maybe with a drizzle of chocolate or even a dusting of powdered sugar—just for fun!
Top Tricks
- If you want those meringues to really shine, make sure your mixing bowl is squeaky clean—no grease or residue.
Frequently Asked Questions
Can I make pavlovas in advance?
Absolutely! You can whip them up a day before. Just make sure to store them properly, and they’ll be ready for you!
How do I store leftover pavlovas?
Any leftovers should go in an airtight container at room temperature. They can last a couple of days, though they’re best fresh.
What if my pavlovas crack?
Cracking can happen if the oven temp is too high or if they cool too quickly. Gradual cooling is your friend here, so make sure you follow that step!
Can I make them without a mixer?
You can definitely get by with a whisk and a bit of elbow grease, but oh boy, it’s quite the workout!
Conclusion
Mini Pavlovas really are this wonderful mix of airy and creamy and oh-so-pretty. They make any occasion feel special, and I love how you can build them up with your favorite fruits. Whether it’s just to indulge or to share with friends, they always, always impress. Plus, it’s just kind of fun decorating them—they’re like little canvases for your sweet creativity!
More recipe suggestions and combinations
Chocolate Pavlova
If you’re a chocolate lover, blend in some cocoa powder for a rich twist. Top with ganache and berries for a real treat.
Citrus Pavlova
Add lemon or orange zest into the meringue—so refreshing! Pair it with citrus curd and segments for a zesty punch.
Banana and Salted Caramel Pavlova
Sliced bananas with salted caramel drizzled on top? Yes, please!
Mixed Berry Pavlova
Top with an array of berries—strawberries, blueberries, maybe even some mint leaves for a fresh touch!
Passionfruit Pavlova
Sprinkle with passionfruit pulp for that tropical burst with every bite!
Baked Alaska Mini Pavlova
Imagine layering them with ice cream, then covering in meringue—quickly bake for a jaw-dropper dessert!